
nerd speak for the software designer
Wednesday, December 15, 2021
Hierarchy ID: Model Your Data Hierarchies With SQL Server 2008
Click this article to see how CTEs and UNION ALL can be used to create a recursive query to flatten a hierarchy relationship into a bread crumb style path: Hierarchy ID: Model Your Data Hierarchies With SQL Server 2008

Thursday, September 21, 2017
Thursday, May 19, 2016
Monday, March 14, 2016
Saturday, December 19, 2015

Monday, December 14, 2015
Monday, December 7, 2015
Inner Vs. Outer Join
What is the difference between and inner and out join in SQL? I hear this question a lot (at work, when I conduct interviews, and when I'm interviewed). The answer isn't as straight forward as you may think. Here is a diagram from the article "Visual Representation of SQL Joins" by C.L. Moffat that show's a visual representation of what each time of join does:

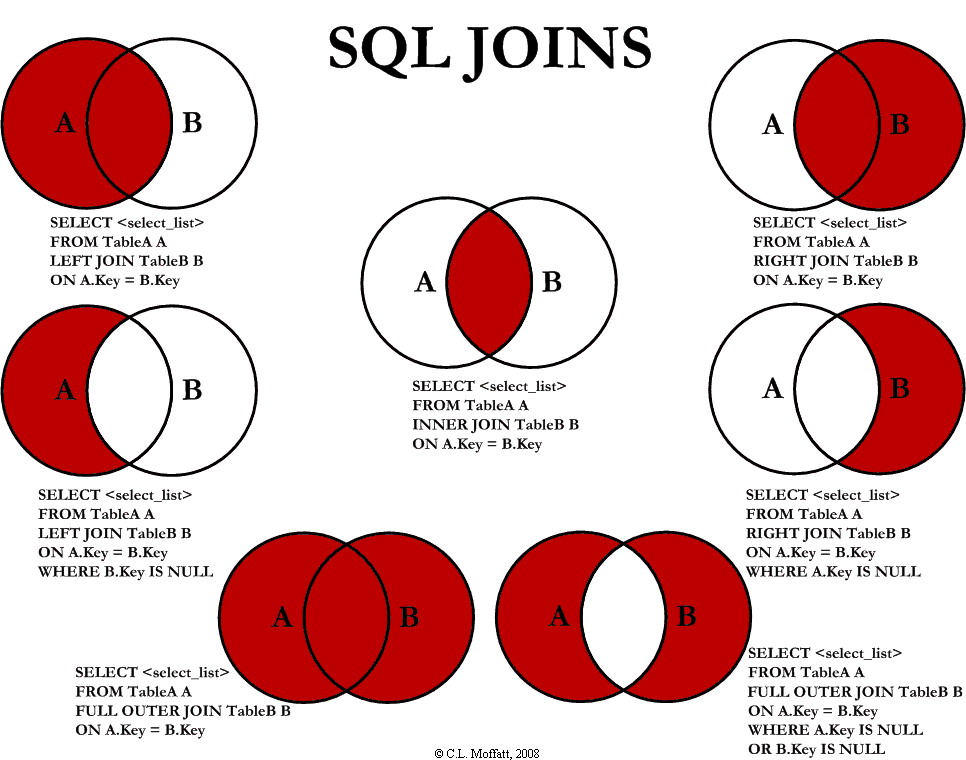
There are other good discussion on the difference between inner and outer joins found in Stack Overflow.
Sunday, November 29, 2015
Thursday, November 19, 2015
Python IDEs

Monday, September 21, 2015

Monday, September 14, 2015
Sunday, September 13, 2015
How to Get Powershell Variables
Open Powershell window and type Get-Variables or gv
PS C:\Users\username> get-variable
PS C:\Users\username> gv
Links
https://technet.microsoft.com/en-us/library/hh849899.aspx
PS C:\Users\username> get-variable
PS C:\Users\username> gv
Links
https://technet.microsoft.com/en-us/library/hh849899.aspx
How to View All Environment Variable and Their Values
Mac:
Open a terminal window and type printenv
~$ printenv
Windows (DOS):
Open a Command Prompt and type set
c:\Users\username? set
Windows (Powershell):
Open a Powershell window and type Get-Childitem env:
PS C:\Users\username> Get-Childitem env:
Links
Mac/Unix Bash Shell
Dos
Powershell
Wednesday, September 2, 2015

Friday, August 28, 2015
Get a Git Cheat Sheet
I've been playing around with Sublime Text and a customizable Cheat Sheet package. One reason I did this was to store a Git cheat sheet. Hear are a few I found online just by searching "Git Cheat Sheet":


Sometimes we do things the way we have always done things not realizing there's an easier or better way to do it. To a computer geek, CI usually means continuous integration, but it can also mean continuous improvement. Let's face it, it always nice to learn something new and share with our work colleagues or online community. After all, that's one reason why we blog about these things. So grab a Git cheat sheet and share something you learned with a friend.
Links
http://zrusin.blogspot.com.au/2007/09/git-cheat-sheet.html
http://overapi.com/git/
http://www.git-tower.com/blog/git-cheat-sheet/
Google Git Cheat Sheets


Sometimes we do things the way we have always done things not realizing there's an easier or better way to do it. To a computer geek, CI usually means continuous integration, but it can also mean continuous improvement. Let's face it, it always nice to learn something new and share with our work colleagues or online community. After all, that's one reason why we blog about these things. So grab a Git cheat sheet and share something you learned with a friend.
Links
http://zrusin.blogspot.com.au/2007/09/git-cheat-sheet.html
http://overapi.com/git/
http://www.git-tower.com/blog/git-cheat-sheet/
Google Git Cheat Sheets
Sunday, August 23, 2015
Cheat Sheets in Sublime Text
Sublime is a lightweight free text editor. I started using Sublime Text, when version 2.0 came out. The more I use it, the more it grows on me. Sublime Text 3 (beta) is available for OS X, Windows, or Linux (both 32 or 64 bit versions).
Besides being lightweight, having a built in regular expressions engine, a console, built in syntax coloring for a variety of file formats and programming languages; it's also extensible.
One of my favorite extensions is the Package Control extension, by which you can add packages. One package that I found helpful was the Cheat Sheet package.
It allows you to use keyboard shortcuts to access existing cheat sheets that have already been created for you and allows you to create your own:

Create Your Own Cheat Sheet
Use the following for the package path:
Mac OSX - /Users/<user>/Library/Application Support/Sublime Text 3/Packages or within Sublime Text navigate via the menu: Sublime Text 3 > Preferences > Browse Packages
Use the following for the menu path:
Mac OSX - /Users/<user>/Library/Application Support/Sublime Text 3/Packages/Cheat Sheets/Main.sublime-menu
Alternatively you can following to get the path: view.run_command("cheat_sheet_tester", {"cheatsheet": "$filename"})
Besides being lightweight, having a built in regular expressions engine, a console, built in syntax coloring for a variety of file formats and programming languages; it's also extensible.
One of my favorite extensions is the Package Control extension, by which you can add packages. One package that I found helpful was the Cheat Sheet package.
It allows you to use keyboard shortcuts to access existing cheat sheets that have already been created for you and allows you to create your own:
| Command | Keyboard Shortcut |
|---|---|
| Bash * | Ctrl + Shft + C, S, H |
| Git * | Ctrl + Shft + C, G, I, T |
| Github Flavored Markdown * | Ctrl + Shft + C, G, F, M |
| Go * | Ctrl + Shft + C, G, O |
| KDE * | Ctrl + Shft + C, K, D, E |
| Regular Expressions | Ctrl + Shft + C, R, X |
| Sublime Text * | Ctrl + Shft + C, S, T |
* Incomplete sheet.
Create Your Own Cheat Sheet
Use the following for the package path:
Windows 7 - C:\Users\<user name>\AppData\Roaming\<your version of sublime text>\Packages\Cheat Sheets (e.g. C:\Users\jsmith\AppData\Roaming\Sublime Text 3\Packages\Cheat Sheets).
Use the following for the menu path:
Windows 7 - C:\Users\<user name>\AppData\Roaming\<your version of sublime text>\Packages\Cheat Sheets\Main.sublime-menu
Alternatively you can following to get the path: view.run_command("cheat_sheet_tester", {"cheatsheet": "$filename"})
Next follow the steps in How to Add Your Own Cheat Sheets or here:
How to add your own Cheat Sheets
How to add your own Cheat Sheets
- Add your cheat sheet to
$ST/Packages/User/cheat-sheets/$filename.cheatsheet. - Add a keyboard shortcut by adding the following line to
$ST/Packages/User/Default ($OS).sublime-keymapand change the keys and $filename:[ { "keys": ["ctrl+shift+c", "n", "s"], "command": "cheat_sheet", "args": {"cheatsheet": "$filename"} } ]
- Add a menu entry by adding the following to
$ST/Packages/User/Main.sublime-menuand change both instances of $filename:[ { "id": "tools", "children": [ { "id": "cheat-sheets", "caption": "Cheat Sheets", "children": [ { "caption": "$filename", "command": "cheat_sheet", "args": {"cheatsheet": "$filename"} } ]} ]} ]
- Add a palette item to
$ST/Packages/User/Default.sublime-commandsand change both instances of $filename.[ { "caption": "Cheat Sheet: $filename", "command": "cheat_sheet", "args": {"cheatsheet": "$filename"} } ]
To add multiple cheat sheets copy and paste just the keys or caption line and add a comma in between each entry to all the above files. - Highlighting follows this format:
>\t Header
>\t\t Subtext
Text
Command \t Text
Command \s\s Text
\tCommand \t Text # Comments
Where \t means tab and \s means space.
- If there's a problem, you can use the cheat_sheet_tester command. The tester command will print in the console the file paths where it expected to find your $filename. The console can be opened with
Ctrl + `orView > Show Console.The tester command can be run directly in the console with:view.run_command("cheat_sheet_tester", {"cheatsheet": "$filename"})
The tester command can also be run as a keyboard shortcut with:{ "keys": ["ctrl+shift+c", "r", "y"], "command": "cheat_sheet_tester", "args": {"cheatsheet": "$filename"} }
Friday, August 21, 2015
How to Add Your Current Git Branch to Your Terminal Prompt in Unix/Mac OSX?
1. Download the git-prompt.sh file from github using the curl command in the terminal window.
~ ? curl -Lo .git-prompt.sh https://raw.githubusercontent.com/git/git/master/contrib/completion/git-prompt.sh
2. Add the following to your .bash_profile or .bashrc file:
This small script adds an if statement to check if the file exists, sets the source to .git-prompt.sh, and set the PS1 variable to point to the __git_ps1 function in the .git-prompt.sh file. The \e[1;32m and \e[m\ are color tags used to color the branch text.
When you navigate to a folder that contains a git repository you should see something like the following:
GitProjectFolder (Master) $ git checkout NewBranch
GitProjectFolder (NewBranch) $ ~ ? curl -Lo .git-prompt.sh https://raw.githubusercontent.com/git/git/master/contrib/completion/git-prompt.sh
2. Add the following to your .bash_profile or .bashrc file:
if [ -f ~/.git-prompt.sh ]; then
source ~/.git-prompt.sh
export PS1='\W\e[1;32m$(__git_ps1 "(%s)")\e[m\$ '
fi This small script adds an if statement to check if the file exists, sets the source to .git-prompt.sh, and set the PS1 variable to point to the __git_ps1 function in the .git-prompt.sh file. The \e[1;32m and \e[m\ are color tags used to color the branch text.
When you navigate to a folder that contains a git repository you should see something like the following:
GitProjectFolder (Master) $ git checkout NewBranch
Links
Change the Terminal Command Prompt
Customizing the Color of Your Terminal Prompt
Tuesday, August 18, 2015
Nano Keyboard Shortcuts
Nano is an rich editor like Emacs and runs in the Terminal Window. To access Nano help type Ctrl+G, you'll be presented with a list of the commands available. The following has been copied from Nano Keyboard Commands page.
NOTE: Any command prefixed with a caret symbol (^) means to use the Ctrl key (e.g., ^G means to press the Ctrl+G keys at the same time). Any command prefixed with the letter M means to press the Alt key (e.g., M-R means to press the Alt+R keys together).
Most Helpful!
|
Ctrl Key Combination
|
Function Key
|
Alt Key Combination
|
Description
|
***
|
^G
|
F1
|
Display the help text
| |
***
|
^X
|
F2
|
Close the current file buffer / Exit from nano
| |
***
|
^O
|
F3
|
Write the current file to disk
| |
^J
|
F4
|
Justify the current paragraph
| ||
^R
|
F5
|
Insert another file into the current one
| ||
***
|
^W
|
F6
|
Search for a string or a regular expression
| |
***
|
^Y
|
F7
|
Move to the previous screen
| |
***
|
^V
|
F8
|
Move to the next screen
| |
***
|
^K
|
F9
|
Cut the current line and store it in the cutbuffer
| |
***
|
^U
|
F10
|
Uncut from the cutbuffer into the current line
| |
***
|
^C
|
F11
|
Display the position of the cursor
| |
^T
|
F12
|
Invoke the spell checker, if available
| ||
***
|
^_
|
F13
|
M-G
|
Go to line and column number
|
***
|
^\
|
F14
|
M-R
|
Replace a string or a regular expression
|
^^
|
F15
|
M-A
|
Mark text at the cursor position
| |
***
|
F16
|
M-W
|
Repeat last search
| |
***
|
M-^ or M-6
|
Copy the current line and store it in the cutbuffer
| ||
M-}
|
Indent the current line
| |||
M-{
|
Unindent the current line
| |||
^F
|
Move forward one character
| |||
^B
|
Move back one character
| |||
^Space
|
Move forward one word
| |||
M-Space
|
Move back one word
| |||
***
|
^P
|
Move to the previous line
| ||
***
|
^N
|
Move to the next line
| ||
***
|
^A
|
Move to the beginning of the current line
| ||
***
|
^E
|
Move to the end of the current line
| ||
M-( or M-9
|
Move to the beginning of the current paragraph
| |||
M-) or M-0
|
Move to the end of the current paragraph
| |||
M-\ or M-|
|
Move to the first line of the file
| |||
M-/ or M-?
|
Move to the last line of the file
| |||
***
|
M-]
|
Move to the matching bracket
| ||
M-- or M-_
|
Scroll up one line without scrolling the cursor
| |||
M-+ or M-=
|
Scroll down one line without scrolling the cursor
| |||
***
|
M-< or M-,
|
Switch to the previous file buffer
| ||
***
|
M-> or M-.
|
Switch to the next file buffer
| ||
M-V
|
Insert the next keystroke verbatim
| |||
^I
|
Insert a tab at the cursor position
| |||
^M
|
Insert a newline at the cursor position
| |||
^D
|
Delete the character under the cursor
| |||
^H
|
Delete the character to the left of the cursor
| |||
M-T
|
Cut from the cursor position to the end of the file
| |||
M-J
|
Justify the entire file
| |||
M-D
|
Count the number of words, lines, and characters
| |||
***
|
^L
|
Refresh (redraw) the current screen
| ||
M-X
|
Help mode enable/disable
| |||
***
|
M-C
|
Constant cursor position display enable/disable
| ||
M-O
|
Use of one more line for editing enable/disable
| |||
M-S
|
Smooth scrolling enable/disable
| |||
M-P
|
Whitespace display enable/disable
| |||
M-Y
|
Color syntax highlighting enable/disable
| |||
M-H
|
Smart home key enable/disable
| |||
***
|
M-I
|
Auto indent enable/disable
| ||
M-K
|
Cut to end enable/disable
| |||
M-L
|
Long line wrapping enable/disable
| |||
M-Q
|
Conversion of typed tabs to spaces enable/disable
| |||
M-B
|
Backup files enable/disable
| |||
M-F
|
Multiple file buffers enable/disable
| |||
M-M
|
Mouse support enable/disable
| |||
M-N
|
No conversion from DOS/Mac format enable/disable
| |||
M-Z
|
Suspension enable/disable
|
Links
Nano Tutorial Page
Nano Tutorial Page
Customizing the Color of Your Terminal Prompt
I posted a quick tip a couple of weeks ago about on how to Change the Terminal Command Prompt.
I want to take it one step further and add custom color to the prompt and/or to a portion of the prompt.
I want to take it one step further and add custom color to the prompt and/or to a portion of the prompt.
currentDirectory$ export PS1='\e[1;32m\W\e[m\$'
currentDirectory$
I found this link to be a good bash prompt overview of how to customize your terminal prompt and has a list of fore and background colors show below:
Foreground colors, Normal (non-bold) is the default, so the 0; prefix is optional.
\e[0;30m = Dark Gray
\e[1;30m = Bold Dark Gray
\e[0;31m = Red
\e[1;31m = Bold Red
\e[0;32m = Green
\e[1;32m = Bold Green
\e[0;33m = Yellow
\e[1;33m = Bold Yellow
\e[0;34m = Blue
\e[1;34m = Bold Blue
\e[0;35m = Purple
\e[1;35m = Bold Purple
\e[0;36m = Turquoise
\e[1;36m = Bold Turquoise
\e[0;37m = Light Gray
\e[1;37m = Bold Light Gray
\e[1;30m = Bold Dark Gray
\e[0;31m = Red
\e[1;31m = Bold Red
\e[0;32m = Green
\e[1;32m = Bold Green
\e[0;33m = Yellow
\e[1;33m = Bold Yellow
\e[0;34m = Blue
\e[1;34m = Bold Blue
\e[0;35m = Purple
\e[1;35m = Bold Purple
\e[0;36m = Turquoise
\e[1;36m = Bold Turquoise
\e[0;37m = Light Gray
\e[1;37m = Bold Light Gray
Background colors:
\e[40m = Dark Gray
\e[41m = Red
\e[42m = Green
\e[43m = Yellow
\e[44m = Blue
\e[45m = Purple
\e[46m = Turquoise
\e[47m = Light Gray
\e[41m = Red
\e[42m = Green
\e[43m = Yellow
\e[44m = Blue
\e[45m = Purple
\e[46m = Turquoise
\e[47m = Light Gray
Subscribe to:
Posts (Atom)